How to Create and Manage a Bucket in Amazon S3
Amazon Simple Storage Service or Amazon S3 is cloud storage for the internet. It offers a simple web services interface that allows you to store and retrieve any amount of data, at any time, from anywhere on the web. This service is designed to maximize the benefits of web-scale computing and transfer its advantages to the developers. This post takes a look at the two major concepts of Amazon S3- buckets and objects- and explains how to work with buckets using Amazon S3 API.
Buckets and Objects in Amazon S3
Buckets and objects are referred as resources in terms of implementation and this provides APIs for you to manage them. For instance, you can create a bucket and upload objects using the Amazon S3 API. These operations can be performed using the Amazon S3 console. The console makes use of the Amazon S3 APIs to send requests to Amazon S3.
In order to upload your data such as a photo, a video or a document, you first need to create a bucket in one of the AWS regions. You can then upload any number of objects to the bucket. A bucket is a container for storing objects in Amazon S3.
Buckets serve several purposes:
-
organize the Amazon S3 namespace at the highest level
-
play a role in access control
-
serve as the unit of aggregation for usage reporting
-
identify the account responsible for storage and data transfer charges
Buckets can be configured is such a way that they are created in a specific region. Regardless of the AWS Region in which you create the bucket, the bucket name will be globally unique. From each of your AWS accounts, you can create up to 100 buckets. If you need more buckets, you can increase your bucket limit by submitting a service limit increase.
There are various options present to configure your bucket. You can configure your bucket for website hosting, add configuration to manage lifecycle of objects in the bucket, and configure the bucket to log all access to the bucket. Using Amazon S3, you can create and manage sub resources, that allows you to store and manage the bucket configuration information. Alternatively, you can use the AWS console or the AWS SDKs.
Creating a bucket in Amazon S3: A sample application
Following section illustrates how to create a bucket and upload/ download objects from the bucket programmatically using AWSSDK .Net.
- Create an AWS Account and Credentials: To use the AWS SDK for .NET to access AWS, you need an AWS account and AWS credentials. Go to ‘https://aws.amazon.com/’ and sign up.
- Create an IAM user and download (or copy) its secret access key. To use the AWS SDK for .NET, you must have a set of valid AWS credentials, which consists of an access key and a secret
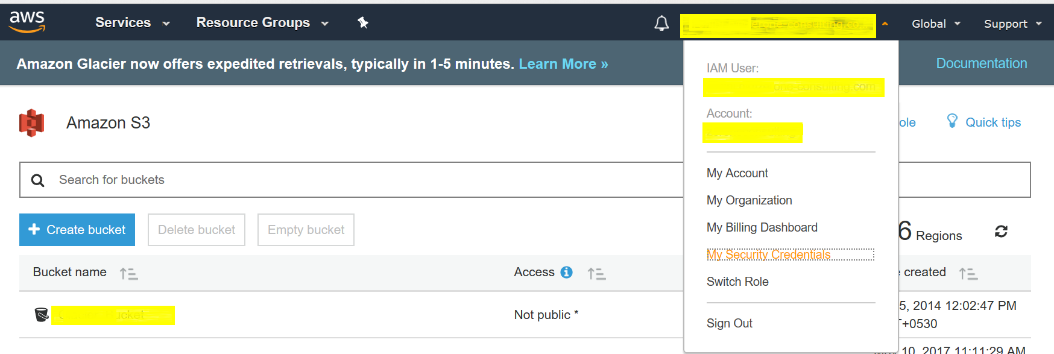

Click (+) Access Keys> create New Access Key button > download the key file

- Download AWSSDK. You can download it from https://aws.amazon.com/tools/
- Create a new application and add the SDK to your application. Adding SDK to New Application

- Create Bucket: In order to create a bucket, you need to ensure below points regarding the naming of bucket.
-
- Should not contain uppercase characters
-
Should not contain underscores (_)
-
Should be between 3 and 63 characters long
-
Should not end with a dash
-
Cannot contain two, adjacent periodsBucket name should conform with DNS requirements:
-
Cannot contain dashes next to periods (e.g., “my-.bucket.com” and “my.-bucket” are invalid)
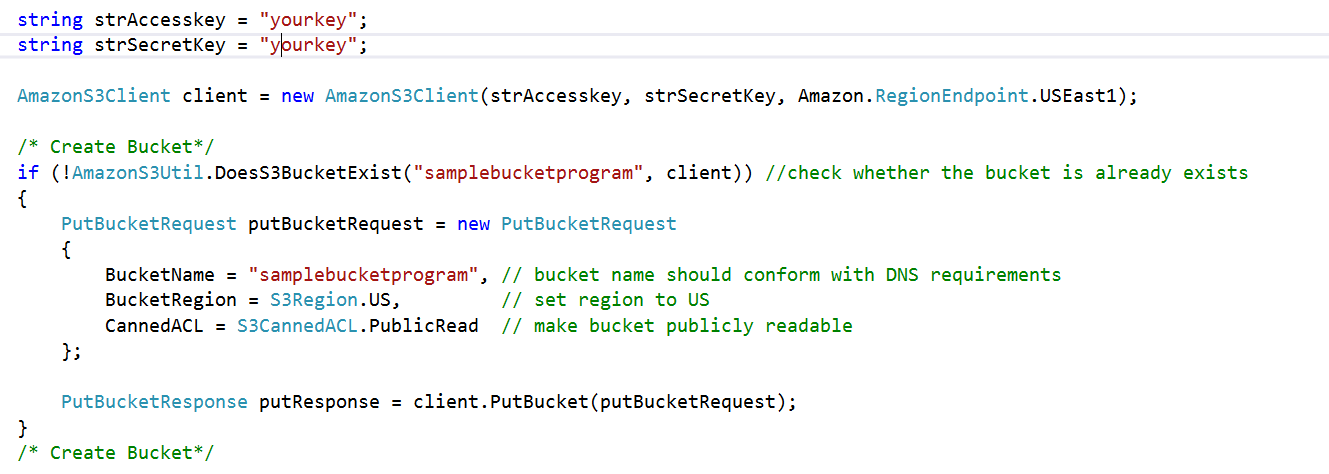
This will create a bucket in the AWS account you provided and the bucket is publicly readable.

- Storing a file to the bucket you’ve created. Refer the following screenshot:
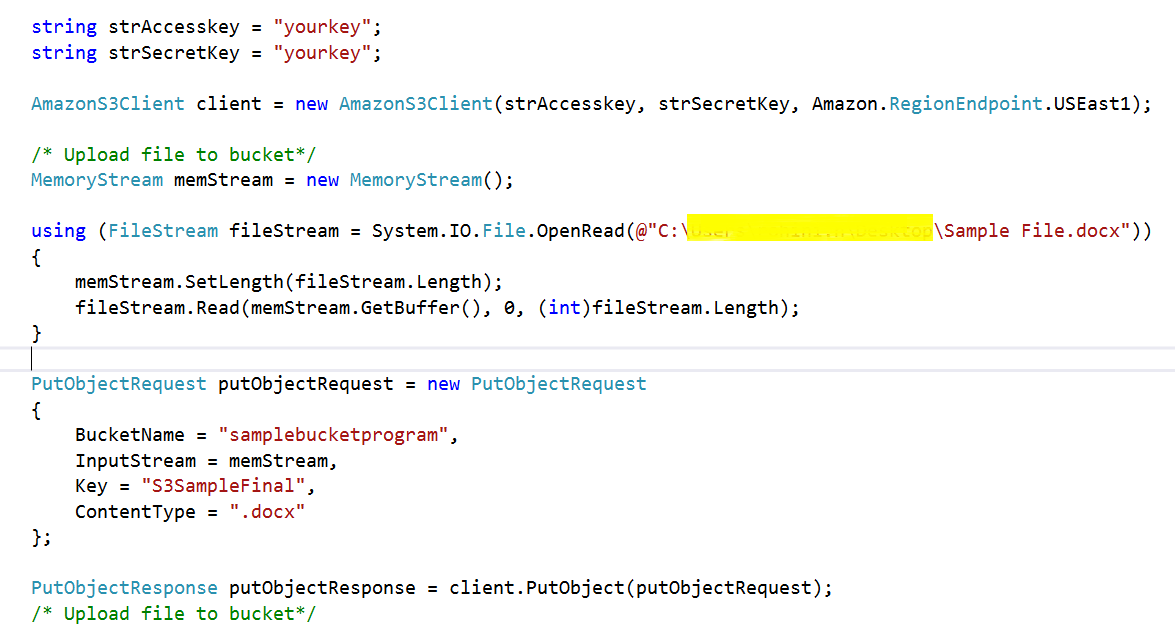
The file is stored in the bucket as shown below:

- Getting the stored file from the bucket. Refer the following screenshot:

- Deleting the file from the bucket. Refer the following screenshot:

Try out the above steps to create your bucket in AWS S3 and store, retrieve and delete files in the bucket. Let us know how these steps worked for you. To learn more about working with other components of AWS S3 service, refer AWS website.
We can help!
Optimizing Legacy Applications: Effective Strategies For Tco Reduction
#Applicationre-engineering
Optimizing Relational Databases: Sql Server & Postgresql
#Applicationre-engineering
Assess Current Database Environment: A Crucial Step In Database Migration
#Applicationre-engineering

