Socket io integration in epic stack framework without losing vite tool features

Renjith T Rajan

What is epic stack?
The Remix Epic Stack is a robust and opinionated starter template for building modern web applications using the Remix framework. It provides a comprehensive setup, integrating various tools, libraries, and configurations to help developers quickly get started with feature-rich applications.
What is Remix?
Remix is a modern web framework built on React, focusing on server-rendered applications with fast page loads, excellent developer experience, and robust handling of complex workflows like data loading, mutations, and error boundaries.
What Makes It "Epic"?
The Epic Stack combines the power of Remix with additional tools and conventions to provide an "epic" starting point for developers. It is designed to handle common challenges in web application development, such as authentication, testing, deployment, and more.
Integrating Socket.IO with Remix Epic Stack: Real-Time Features Made Simple
In the world of modern web applications, real-time communication has become a critical feature for enhancing user experience. Whether it's enabling live chat, real-time notifications, collaborative tools, or dynamic updates, real-time functionality keeps users connected and engaged. This is where Socket.IO, a powerful library for real-time bidirectional event-based communication, shines.
The Remix Epic Stack is an ideal foundation for building robust web applications, thanks to its scalable architecture and pre-configured tools. However, out of the box, it does not include a real-time communication setup. By integrating Socket.IO, you can unlock the potential of real-time features while leveraging the benefits of the Epic Stack's structured and opinionated setup.
In this blog, we’ll explore how to seamlessly integrate Socket.IO into the Remix Epic Stack. We'll cover everything from setting up a Socket.IO server, handling events, and ensuring compatibility with Remix's server-side rendering (SSR) capabilities. By the end of this guide, you'll have the tools to build real-time functionality into your Remix Epic Stack application, empowering you to create dynamic, responsive, and user-centric web applications.
What You’ll Learn in This Blog
1 Introduction to Socket.IO:
· Understanding the role of Socket.IO in enabling real-time communication.
· Key features and why it's a great choice for real-time apps.
2 Preparing Your Remix Epic Stack:
· Setting up the development environment for Socket.IO integration.
· Configuring your backend to support real-time connections.
3 Implementing Socket.IO:
· Creating a Socket.IO server in your Epic Stack backend.
· Managing client-server communication using events.
4 Integrating with the Frontend:
· Connecting the Remix frontend to the Socket.IO without losing vite tool features.
· Listening for updates and handling real-time events in React components.
What is Socket.IO?
Socket.IO is a powerful JavaScript library that facilitates real-time, bidirectional, and event-based communication between clients (typically browsers) and servers. It is built on top of WebSockets and provides a more robust and feature-rich abstraction, ensuring reliable communication even in environments with network constraints.
Socket.IO is widely used for applications that require instant communication, such as:
· Live chat applications
· Real-time notifications
· Collaborative tools (e.g., shared document editing)
· Multiplayer games
· Live dashboards and analytics
How Socket.IO Works
At its core, Socket.IO operates on a client-server model:
1. Client-Side:
· The client library is loaded in the browser or a Node.js application. It manages the connection to the server and listens for or emits events.
2. Server-Side:
· The server library is integrated into the backend application. It listens for connections from clients and handles event-based communication.
Preparing Your Remix Epic Stack for Socket.IO Integration
Before you start, ensure you have the following:
1. Remix Epic Stack Installed
· A working Remix application based on the Epic Stack.
· If you haven’t set it up yet, refer to the https://www.epicweb.dev/epic-stack
2. Node.js and npm/yarn Installed
· Confirm that you have Node.js and a package manager (npm or yarn) installed.
3. Database and Server Configuration
· Verify that your database and backend server are running without issues. Socket.IO will typically integrate into the backend for real-time data exchange. The Remix Epic Stack uses the Express adapter to run the backend server. This provides flexibility for integrating additional middleware, third-party libraries (like Socket.IO), and custom API endpoints.
4. Dependencies
· Ensure you have essential dependencies for the Epic Stack, such as Prisma, Tailwind CSS, and Vitest, properly configured.
Install Socket.IO
Socket.IO requires two primary packages: one for the server-side and another for the client-side.
Install Server-Side Package
Run the following command to install the server-side library: npm install socket.io
Install Client-Side Package
Run the following command to install the client-side library: npm install socket.io-client
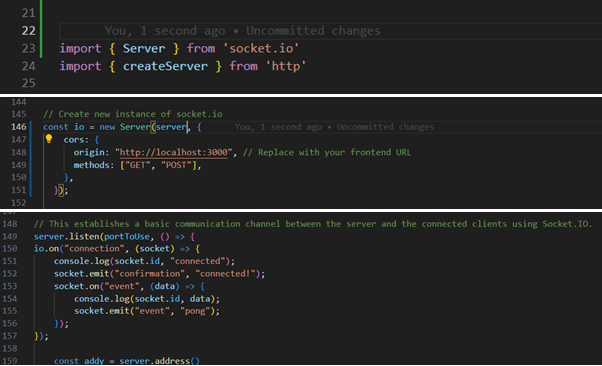
Backend Server Configuration
Socket.IO needs to hook into your backend server. By default, Remix epic stack uses a Node.js-based server, which can host the Socket.IO server.
Update Your index File
Inside your server folder (typically index.js or index. ts), integrate Socket.IO like this
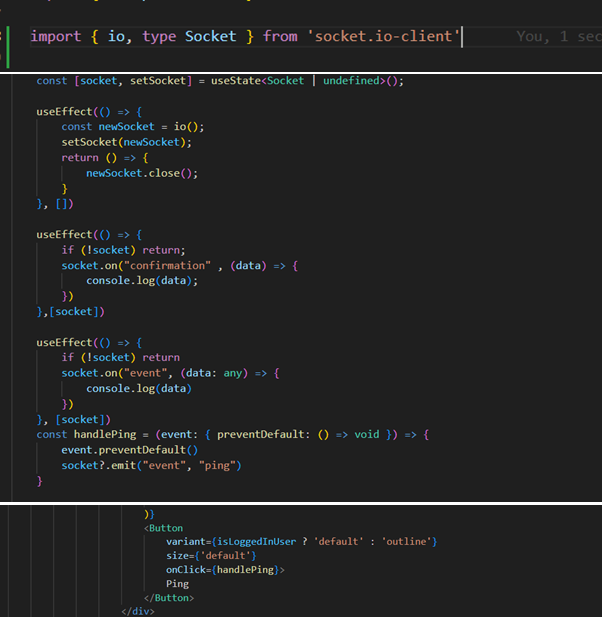
Frontend Client Setup
To enable real-time communication on the frontend, configure the client to connect to your Socket.IO server
Add Client Code
In your React components, import and initialize the Socket.IO client:
With your Remix Epic Stack prepared and Socket.IO integrated, you’re ready to build engaging, real-time features into your application
In the Epic Stack, when you run the command npm run dev, it triggers the dev:dev script in the package.json file. This script runs the dev-server.js file located in the server folder. The purpose of dev-server.js is to handle the development environment setup. The tsx watch command is active, which watches your TypeScript files and starts the server automatically when changes are detected.
If we use the tsx watch command in the development server setup, we won't get Vite's powerful features like Hot Module Replacement (HMR), which allows instant updates to the browser without a full reload.
tsx watch focuses on watching and rebuilding TypeScript files. While it efficiently restarts the server when code changes, it doesn’t integrate with the browser for live updates. But we use the vite command only in the development server setup, we can’t connect with the socket io, so that we can implement both together, add this below code in your dev-server.js file.
To fix the issue where the Vite server does not integrate with your Socket.IO implementation while maintaining compatibility with the tsx watch command, you can enhance your development setup to ensure both systems work together. Here's a solution:
Approach
1. Use Vite’s Proxy:
Leverage Vite’s proxy capabilities to forward WebSocket or HTTP requests for Socket.IO to the backend where your index.js is running.
2. Run Both Servers in Parallel:
Keep the tsx watch command running to handle the backend server with Socket.IO while the Vite server handles the frontend development.
3. Modify Your dev-server.js:
Update the script to ensure both servers run in parallel without conflicts.
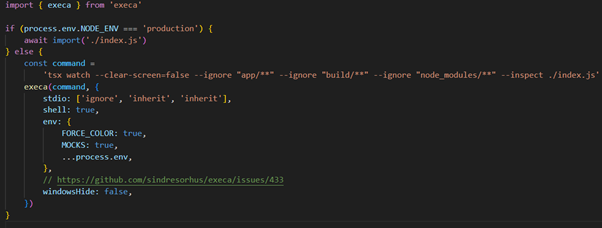
// In Next.js 14

import { execa } from "execa";

if (process.env.NODE_ENV === "production") {
  await import("./index.js");
} else {
  const backendCommand =
    'tsx watch --clear-screen=false --ignore "**/*.timestamp-*" --ignore "app/" --ignore "build/" --ignore "node_modules/**" --inspect ./index.js';
  const frontendCommand = "remix vite:dev --force --cors --clearScreen=false";

  // Run both backend and frontend servers in parallel
  const backendProcess = execa(backendCommand, {
    stdio: ["ignore", "inherit", "inherit"],
    shell: true,
    env: {
      FORCE_COLOR: true,
      MOCKS: true,
      ...process.env,
    },
    windowsHide: false,
  });

  const frontendProcess = execa(frontendCommand, {
    stdio: ["ignore", "inherit", "inherit"],
    shell: true,
    env: {
      FORCE_COLOR: true,
      MOCKS: true,
      ...process.env,
    },
    windowsHide: false,
  });

  // Handle process termination for both processes
  const handleExit = () => {
    backendProcess.kill("SIGTERM");
    frontendProcess.kill("SIGTERM");
    process.exit(0);
  };

  process.on("SIGINT", handleExit);
  process.on("SIGTERM", handleExit);

  // Await both processes
  await Promise.all([backendProcess, frontendProcess]);
}
4. Vite Proxy for Socket.IO:
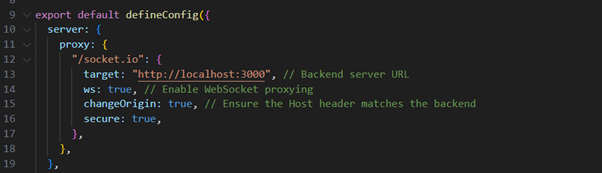
Ensure your vite.config.ts contains a proxy configuration for the WebSocket requests:
Benefits
1. Socket.IO Integration:
The tsx watch command ensures your backend (with Socket.IO) continues running, and Vite forwards WebSocket requests correctly
2. Seamless Development:
Vite still handles frontend development, hot module replacement, and other optimizations.
3. Independent Builds:
Both backend and frontend processes are isolated, ensuring compatibility and no overlap in responsibilities.
By using this dual-server approach, you can run both the Vite server and your Socket.IO server together without compromising on functionality or development efficiency.
We can help!